30天学会Python编程:21.Python内存管理:原理、工具与优化策略
当前位置:点晴教程→知识管理交流
→『 技术文档交流 』
|
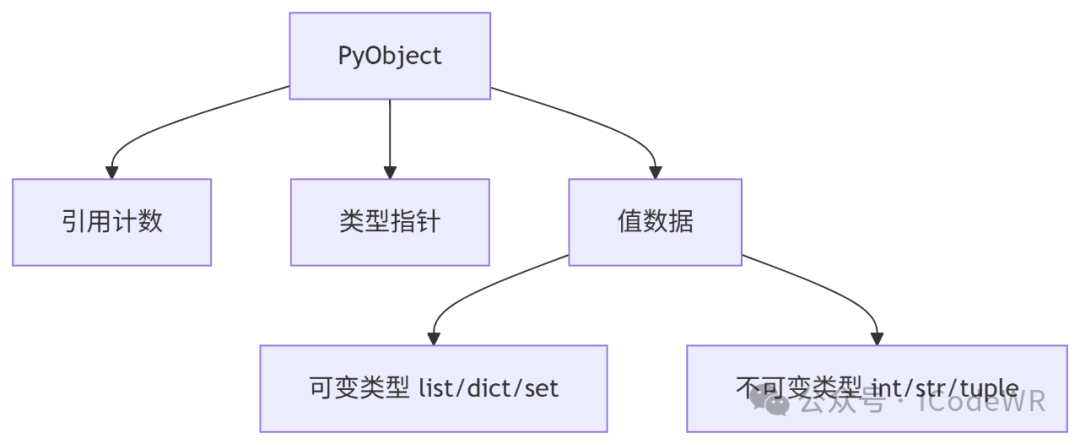
a = 10 | |||
lst = [1,2,3] | |||
obj.attr = value | __dict__中 |
重要概念:
copy.copy() 只复制顶层引用copy.deepcopy() 递归复制所有对象实践建议:
__slots__替代__dict__节省内存(尤其大量小对象时)Python使用引用计数作为主要垃圾回收机制:
import sys

a = [1, 2, 3]  # 引用计数=1
b = a           # 引用计数=2
print(sys.getrefcount(a))  # 显示引用计数(临时+1,因此输出3)

del b           # 引用计数=1
a = None        # 引用计数=0 → 对象被回收
要点提示:
sys.getrefcount()常见陷阱:
del或赋值为None)当对象间形成引用环时,引用计数无法归零,需垃圾回收器(GC)处理:
import gc
import weakref

classNode:
    def__init__(self):
        self.parent = None
        self.children = []

# 创建循环引用
node1 = Node()
node2 = Node()
node1.children.append(node2)
node2.parent = node1

# 解决方案1:手动打破循环
node2.parent = None

# 解决方案2:使用弱引用
node2.parent = weakref.ref(node1)

# 解决方案3:触发垃圾回收
print(gc.collect())  # 返回回收对象数量
GC工作机制:
优化建议:
__del__方法中创建循环引用gc.disable()临时禁用GCweakref模块处理观察者模式等场景逐行分析内存使用情况:
安装pip install memory_profiler :
pip install memory_profiler

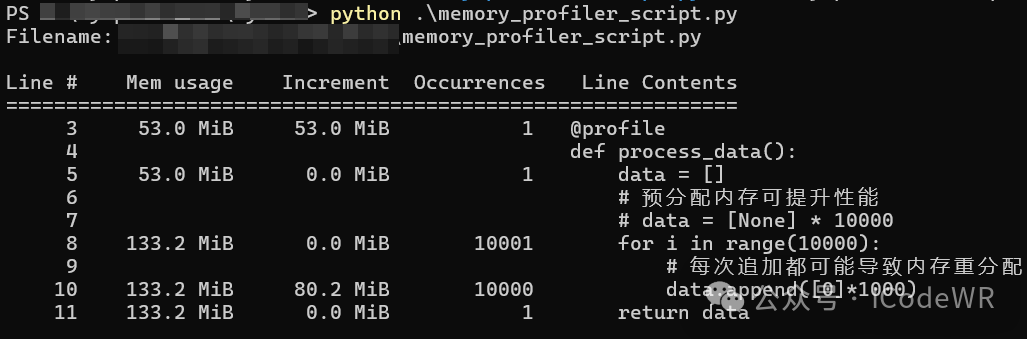
测试脚本:
form memory_profiler import profile

@profile
defprocess_data():
    data = []
    # 预分配内存可提升性能
    # data = [None] * 10000
    for i inrange(10000):
        # 每次追加都可能导致内存重分配
        data.append([0]*1000)
    return data

if __name__ == "__main__":
    process_data()
运行分析:
python -m memory_profiler memory_profiler_scriptss.py
输出解读:
优化建议:
可视化对象引用关系:
import objgraph

# 查找内存中最多实例的类型
objgraph.show_most_common_types(limit=5)

# 生成循环引用图
objgraph.show_backrefs(
    objgraph.by_type('Node')[0],
    filename='refs.png',
    extra_info=lambda x: f"id={id(x)}"
)
使用场景:
高级技巧:
# 统计特定类型对象增长
objgraph.growth(limit=10)

# 查找指定对象的引用链
objgraph.find_backref_chain(
    objgraph.by_type('Node')[0],
    objgraph.is_proper_module
)
表:Python数据结构操作复杂度
选择原则:
set/dictcollections.dequearray.array或numpy.ndarraytuple比list更省内存Python访问局部变量比全局变量快:
import math

defcalculate(values):
    # 将全局函数转为局部变量
    _sqrt = math.sqrt
    _sum = sum

    result = []
    # 避免在循环中访问对象属性
    append = result.append

    for v in values:
        # 使用局部变量加速
        append(_sqrt(_sum(v)))

    return result
性能提升点:
LOAD_FAST字节码(全局为LOAD_GLOBAL)list.append)实现零复制数据访问:
import array

data = array.array('d', [1.0]*10_000_000)

# 创建内存视图(不复制数据)
mv = memoryview(data)

# 修改原始数据的高效方式
mv[1000:2000] = b'\x00'*8000

# 转换为其他格式
nv = mv.cast('B')  # 转为字节视图
使用场景举例:
import numpy as np

# 创建10^6个随机数
data = np.random.rand(10**6)

# 向量化操作(在C层执行)
defvectorized_ops(arr):
    return np.log(arr + 1) * 0.5

# 传统Python循环
defpython_loop(arr):
    result = np.empty_like(arr)
    for i inrange(len(arr)):
        result[i] = math.log(arr[i] + 1) * 0.5
    return result

# 性能对比
%timeit vectorized_ops(data)   # ~5ms
%timeit python_loop(data)      # ~500ms
关键优势:
def process_large_file(file_path, chunk_size=1024*1024):
    """流式处理大文件,内存恒定"""
    withopen(file_path, 'rb') as f:
        # 使用内存视图避免数据复制
        while chunk := f.read(chunk_size):
            process_chunk(memoryview(chunk))

defprocess_chunk(chunk):
    """处理1MB数据块"""
    # 使用高效字节操作
    ifb'\x00'in chunk:
        # 找到零字节位置
        null_pos = chunk.find(b'\x00')
        # 处理逻辑...
优化点:
from functools import lru_cache
import weakref

classSmartCache:
    """带弱引用和大小限制的缓存"""
    def__init__(self, max_size=128):
        self.strong_cache = {}
        self.weak_cache = weakref.WeakValueDictionary()
        self.max_size = max_size
        self.lru = []

    defget(self, key):
        # 首先尝试强引用缓存
        if key inself.strong_cache:
            returnself.strong_cache[key]

        # 其次尝试弱引用缓存
        if key inself.weak_cache:
            value = self.weak_cache[key]
            # 提升为强引用
            self.strong_cache[key] = value
            self._manage_cache()
            return value

        returnNone

    defset(self, key, value):
        self.strong_cache[key] = value
        self._manage_cache()

    def_manage_cache(self):
        """缓存管理策略"""
        # LRU淘汰
        whilelen(self.strong_cache) > self.max_size:
            oldest = self.lru.pop(0)
            # 降级为弱引用
            self.weak_cache[oldest] = self.strong_cache[oldest]
            delself.strong_cache[oldest]
缓存策略对比:
@lru_cache:标准库实现,线程安全weakref:不阻止对象回收,适合大对象
__slots__减少内存开销multiprocessing.shared_memorymmap处理超大文件阅读原文:原文链接


 400 186 1886